

Removing wallpaper may seem overwhelming, but it’s easier than you think when you follow a few simple steps and make a homemade solution. Whether you’re sick of old patterns or getting ready for a fresh coat of paint, this guide will teach you how to make and apply a DIY wallpaper removal solution with items you might already have around the house. And, you’ll save money and skip the harsh chemicals in commercial removers.
Thank you for reading this post, don't forget to subscribe!Here’s what you need to know to make your wallpaper removal project fast, budget-conscious, and (mostly) painless.
Reasons of Trying DIY for Removing Wallpaper
Benefits of using a homemade wallpaper removal solution:
Expense Efficiency: The majority of the substances needed for this plan can probably be found in your storeroom or cleaning supplies: no need to go out and get specific removers.
Non-Toxic: Often, commercial wallpaper removers have chemicals inside that can emit dangerous fumes. On the other hand, a DIY solution is safer for your family.
Eco-Friendly: When you choose natural, non-toxic ingredients like vinegar, you’re helping the environment.
With these benefits in mind, here’s how to get started!
What You’ll Need
The process will go much smoother if you have the right materials on hand. Here’s what to shop for and stock:
Materials:
- White vinegar (everday common grocery item)
- Warm water
- A spray bottle
- A bucket
- A sponge or cloth
- Scraper or putty knife (plastic or metal depending on your wall’s finish)
- Rubber gloves
- Drop cloths or old towels (for covering your floors)
- Painters tape (to cover areas you don’t want to spray)
Optional Tools:
A scoring tool (to perforate stubborn wallpaper)
A steam cleaner (for extra stubborn adhesive)
How to Prepare The Solution — Step By Step
How to mix up your own homemade wallpaper remover:
Step 1: Measure Ingredients
For a common DIY approach, try:
- 1 part white vinegar
- 1 part warm water
Maong pananglitan, timpla ang 2 ka tasa nga suka uban ang 2 ka tasa nga mainit nga tubig.
Step 2: Combine and Mix
Mix together in a spray bottle (the easiest for application) or bucket: Vinegar and water. If using a spray bottle, shake gently or stir it up if you have a bucket.
Step 3 (Optional): Work Around Stubborn Wallpaper
If you have wallpaper that’s especially tricky to peel, you can add a little dish soap (a few drops) to the mixture. The soap can break down the adhesive residues more effectively.
Voila! Your solution is ready.
How to Apply the Wallpaper-Removing Solution
Now that you have your mixture ready, it’s time to get to that wallpaper.
Step 1: Protect the Area
Place drop cloths, old sheets or towels down to protect your floors and nearby furniture.
Mask off electrical outlets or delicate wall trim with painter’s tape.
Step 2: Score the Wallpaper
Use a scoring tool to perforate the surface for vinyl coated or especially stubborn adhesive wallpapers. This helps the mixture get under the adhesive layer.
Step 3: Spray the Solution
Pour your mixture into the spray bottle, then spray a little bit directly onto a small area of wallpaper. Ensure the area is liberally soaked, particularly the edges.
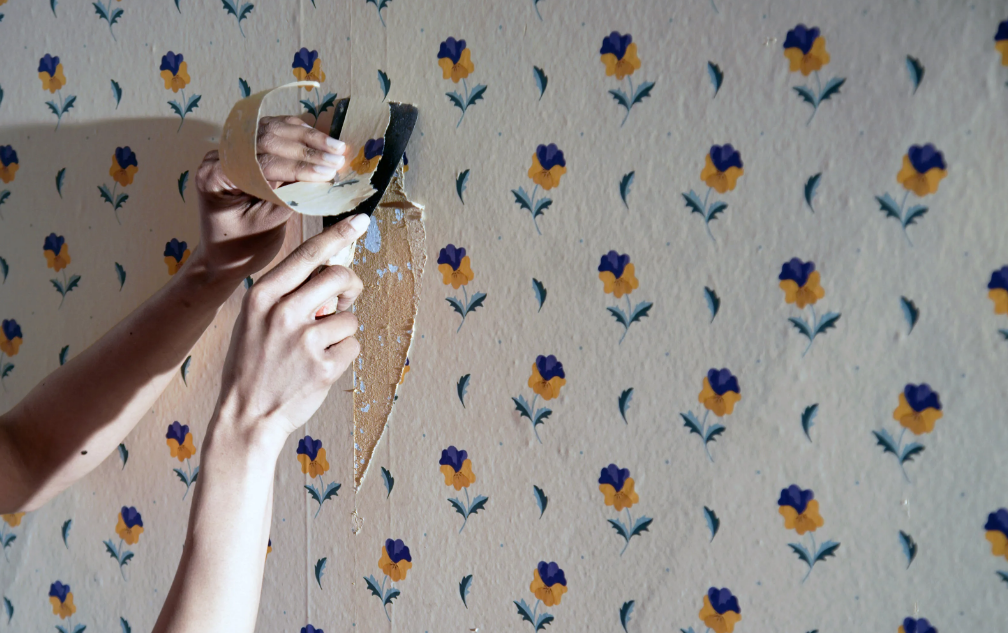
Step 4: Wait and Peel
Let the solution sit on the wallpaper for 10–15 minutes to allow it to soak in. Next, use a scraper or putty knife to gently peel the wallpaper away. Begin in the lower corner and gradually progress upwards.
Pro Tip: If the wallpaper is stubborn, apply solution again and wait 5–10 minutes more before trying to peel anew.
Step 5: Clean the Wall
After you remove the wallpaper, wipe the wall down with a damp sponge or cloth to get rid of any excess adhesive left behind.
Safety Tips to Keep in Mind
Ventilation Matters: Since vinegar is non-toxic, but has a strong odour, the success of this method also relies on ensuring the room is well-ventilated, so open windows or use fans.
Protect Your Hands: Gloves prevent irritation from prolonged exposure to the vinegar and water.
Test First: Do a trial run if you are unsure how your wall surface takes to the solution.
Solutions and Troubleshooting:Alternative
If your homemade mix doesn’t quite cut it, here are some products you can also try:
Fabric Softener Mixture
Substitute the vinegar for fabric softener. Combine 1 part fabric softener and 1 part warm water. It operates in a similar manner, melting the adhesive for scuff-free removal.
Steam
A steam cleaner can make short work of wallpaper stuck on with stubborn adhesive. Just hold the steamer close to the wallpaper, to loosen it before peeling.
Commercial Remover
Commercial wallpaper removers can be bought at your local hardware store if all else fails. If you’re worried about harsh chemicals, seek out non-toxic options.”
Common Troubleshooting Tips:
Wallpaper is Tearing:
- Try breaking up sections and spraying more liberally.
- Residue from the adhesive is impossible to remove:
- Scrub off stubborn adhesive with a sponge dipped in soapy water, or a paste of baking soda mixed with water.
Completing Your Project with Confidence
Congratulations! Now with your freshly bare walls you’re ready to repaint and redesign or just appreciate how nice and fresh open the space feels. Vinegar and water not only do the job but are both safe and low-cost substitutes for chemical removal products.
For even more home improvement tips and tricks, be sure to subscribe to our newsletter so you never miss the latest right in your inbox. We’ll make sure this project is not your last DIY success.”
5mij4b